After conferring with my charming pattern testers (okay, they were just the first to start it), I've made some changes to the old Wellesley Scarf pattern. Basically, I've "stretched" the rows and included some of their ideas, which I completely love! I really do like input and it gives that human connection that the internet sometimes lacks... So thank you all! See more explicit details back at the original post.
- Cristy
Tuesday, March 31, 2009
Sunday, March 29, 2009
A Crocheted Necklace
And back to our regularly scheduled programming...
Finally those patterns as promised. Unfortunately, I can't give you the ring pattern today. I didn't right down what I was doing, but I was thinking during class yesterday and may have come up with an idea. With some tweaking, it may be perfect. But please stay! I promise the patterns I do have will be varied, interesting, and full of potential! This first one gets a post to itself, since I managed to make an absolute mountain out of a molehill. It's much easier than it looks, I promise.
I'm not a big necklace wearer, but I got the idea and had to go with it. I think the crocheted beads could be used with felted or wooden beads for a nice look... Maybe the combination of 70% felted, 20% wooden, and 10% crocheted? I'd like to get some wool for felting... Anyways, the pattern!
Crocheted Necklace

Materials: Small amounts of Bernat Softee Chunky (natural), Lily Sugar'n Cream (soft teal) and Lion Brand Cotton Ease (charcoal). A handful of medium plastic beads (like the really cheap ones you can fine by the hundreds in any craft store). A large needle (like a tapestry needle or a yarn needle). A crochet hook of (probably..) 3.0 mm. I've tried to fit each round in a sentence, so if you don't want to read a paragraph, separate at each period to make it easier to follow. My necklace uses the small ball pattern, but two other sizes have been provided.
Small Ball: Ch 2. Make 3 sc in the first chain (3). Slst in first sc, ch1, and make 2 sc in each of the next three spaces (6). Slst in first sc, ch1, and make 2 sc in each of the next six spaces (12). Slst in first sc, ch1, and sc in each of the next twelve spaces (12). Repeat the last round (12). Repeat the last round again (12). Slst in first dec, ch1, and dec all around (6). Slst in first decrease, ch1, and dec all around (3). Tie off.
Medium Ball: Ch 2. Make 3 sc in the first chain (3). Slst in first sc, ch1, and make 2 sc in each of the next three spaces (6). Slst in first sc, ch1, and make 2 sc in each of the next six spaces (12). Slst in first sc, ch1, and make 2 sc in each of the next twelve spaces (24). Slst in first sc, ch1, and sc in each of the next twelve spaces (24). Repeat the last round five more times(24). Slst in first sc, ch1, and dec all around (12). Slst in first dec, ch1, and dec all around (6). Slst in first decrease, ch1, and dec all around (3). Tie off.
Large Ball: Ch 2. Make 3 sc in the first chain (3). Slst in first sc, ch1, and make 2 sc in each of the next three spaces (6). Slst in first sc, ch1, and make 2 sc in each of the next six spaces (12). Slst in first sc, ch1, and make 2 sc in each of the next twelve spaces (24). Slst in first sc, ch1, and the alternate 1sc and 2sc in each of the next stitches (36). Slst in first sc, ch1, and sc in each of the next thirty-six spaces (36). Repeat the last round eight more times (36). Slst in first sc, ch1, and then alternate between 1sc and 1dec in each of the next stitches (24). Slst in first sc, ch1, and dec all around (12). Slst in first dec, ch1, and dec all around (6). Slst in first dec, ch1, and dec all around (3). Tie off.
Using a yarn or tapestry needle and a length of Cotton Ease, thread a crocheted bead (go through the center of the first round and the center of the last round) and make a knot. Continue alternating the plastic and crocheted beads, knotting after every bead. If the necklace is large enough to fit over your head, just tie a small knot and trim your ends. If the necklace is too small, add a clasp.
Ideas: Try different combinations, sizes, and materials. Use a long ribbon to string the beads and, instead of adding a clasp, tie the ends of the ribbon in a bow. It's a more freeing and artistic take on the classic pearl and ribbon necklace. Using different hooks and different ball patterns, put a large ball in the center and progressively smaller balls on either side. Make an extra long necklace and wrap it unevenly twice around your neck. The yarn I used is very bulky and, if you aren't careful, your beads could end up lopsided. Try using smaller yarn, a smaller hook, and follow the pattern for a large ball. Because I didn't use consistent sizes, types, or even brands of yarn, I have a noticeable size discrepancy between my beads. If you use the same brand and only change the colors, yours will be much more consistent.
What do you think?
-Cristy
Finally those patterns as promised. Unfortunately, I can't give you the ring pattern today. I didn't right down what I was doing, but I was thinking during class yesterday and may have come up with an idea. With some tweaking, it may be perfect. But please stay! I promise the patterns I do have will be varied, interesting, and full of potential! This first one gets a post to itself, since I managed to make an absolute mountain out of a molehill. It's much easier than it looks, I promise.
I'm not a big necklace wearer, but I got the idea and had to go with it. I think the crocheted beads could be used with felted or wooden beads for a nice look... Maybe the combination of 70% felted, 20% wooden, and 10% crocheted? I'd like to get some wool for felting... Anyways, the pattern!
Crocheted Necklace
Materials: Small amounts of Bernat Softee Chunky (natural), Lily Sugar'n Cream (soft teal) and Lion Brand Cotton Ease (charcoal). A handful of medium plastic beads (like the really cheap ones you can fine by the hundreds in any craft store). A large needle (like a tapestry needle or a yarn needle). A crochet hook of (probably..) 3.0 mm. I've tried to fit each round in a sentence, so if you don't want to read a paragraph, separate at each period to make it easier to follow. My necklace uses the small ball pattern, but two other sizes have been provided.
Small Ball: Ch 2. Make 3 sc in the first chain (3). Slst in first sc, ch1, and make 2 sc in each of the next three spaces (6). Slst in first sc, ch1, and make 2 sc in each of the next six spaces (12). Slst in first sc, ch1, and sc in each of the next twelve spaces (12). Repeat the last round (12). Repeat the last round again (12). Slst in first dec, ch1, and dec all around (6). Slst in first decrease, ch1, and dec all around (3). Tie off.
Medium Ball: Ch 2. Make 3 sc in the first chain (3). Slst in first sc, ch1, and make 2 sc in each of the next three spaces (6). Slst in first sc, ch1, and make 2 sc in each of the next six spaces (12). Slst in first sc, ch1, and make 2 sc in each of the next twelve spaces (24). Slst in first sc, ch1, and sc in each of the next twelve spaces (24). Repeat the last round five more times(24). Slst in first sc, ch1, and dec all around (12). Slst in first dec, ch1, and dec all around (6). Slst in first decrease, ch1, and dec all around (3). Tie off.
Large Ball: Ch 2. Make 3 sc in the first chain (3). Slst in first sc, ch1, and make 2 sc in each of the next three spaces (6). Slst in first sc, ch1, and make 2 sc in each of the next six spaces (12). Slst in first sc, ch1, and make 2 sc in each of the next twelve spaces (24). Slst in first sc, ch1, and the alternate 1sc and 2sc in each of the next stitches (36). Slst in first sc, ch1, and sc in each of the next thirty-six spaces (36). Repeat the last round eight more times (36). Slst in first sc, ch1, and then alternate between 1sc and 1dec in each of the next stitches (24). Slst in first sc, ch1, and dec all around (12). Slst in first dec, ch1, and dec all around (6). Slst in first dec, ch1, and dec all around (3). Tie off.
Using a yarn or tapestry needle and a length of Cotton Ease, thread a crocheted bead (go through the center of the first round and the center of the last round) and make a knot. Continue alternating the plastic and crocheted beads, knotting after every bead. If the necklace is large enough to fit over your head, just tie a small knot and trim your ends. If the necklace is too small, add a clasp.
Ideas: Try different combinations, sizes, and materials. Use a long ribbon to string the beads and, instead of adding a clasp, tie the ends of the ribbon in a bow. It's a more freeing and artistic take on the classic pearl and ribbon necklace. Using different hooks and different ball patterns, put a large ball in the center and progressively smaller balls on either side. Make an extra long necklace and wrap it unevenly twice around your neck. The yarn I used is very bulky and, if you aren't careful, your beads could end up lopsided. Try using smaller yarn, a smaller hook, and follow the pattern for a large ball. Because I didn't use consistent sizes, types, or even brands of yarn, I have a noticeable size discrepancy between my beads. If you use the same brand and only change the colors, yours will be much more consistent.
What do you think?
-Cristy
Thursday, March 26, 2009
We now have a Flickr!
During my break from studying for a test tomorrow (eep), I created a Flickr group for the page. Sure, it's early, but it'll be there when the time comes. The group is public, so everyone can join, post, etc. And yes, I will definitely try to feature pictures from the pool here! Here's the url: http://www.flickr.com/groups/tossed_cookies/
Now, I'm going to get back to studying. But I promise some patterns by this weekend, and hopefully it won't all just be limited to crocheting. (Did you know I like to play with hemp?)
-Cristy
Now, I'm going to get back to studying. But I promise some patterns by this weekend, and hopefully it won't all just be limited to crocheting. (Did you know I like to play with hemp?)
-Cristy
Wednesday, March 25, 2009
Crocheted Earrings!
As promised on Craftster, I have some new crochet patterns. Remember the usual copyright rules apply to everything I post. So no copying patterns/images or selling them, please. If you'd like to use something towards a charity, email me the details and we'll work something out. Thanks. Boring lecture over, here's the fun part! A warning: I tend to "manhandle" my yarn ends, since I generally can't be bothered to properly weave my tails in. Hide them however you like, just make sure they're secure.

I've used Vanna's Choice in red, rust, and mustard and whichever hook I grabbed first (probably 3-4 mm). You can use any yarn, really, and whichever size they recommend.
Chain 4. This will form your first triple crochet
Triple crochet 12 or 13 more times into the first chain. 12 stitches make a flatter circle, but your circles may not lie exactly straight. Pull the first chain tight as you go. I also like to hide the starting tail (that seems contradictory) under the triple crochets and then trim the excess.
Slip stitch into the fourth chain. Cut a tail a few inches long (at most) and pull through.
Repeat to make 2 more circles.
Pull the tail on the red (bottom) circle between the 7th and 8th triple on the orange (middle) circle. Bring that tail through the slipped stitch in the red (bottom) circle and (this is the manhandling part) weave the tail back into the red (bottom) circle. Repeat with the orange (middle) and yellow (top) circles.
With the yellow (top) use the tail to make a loop for the earring hook.
A note: If you prefer the circle with 13 total triple crochets, you may want to make the second connection between the circles between the 6th and 7th triple stitch. This will cause them to hang more evenly. Also, if you don't mind slightly longer earrings but like some movement, use jump rings instead of yarn to link the circles together.

These were made with Lily Sugar n' Cream in Soft Teal, again with the first hook I found. However, the yarn is a 4-ply yarn, so I cut a length (several yards) and split the yarn in half. (Twice as much yarn!)
Chain 2. You've made the first sc. Sc 13 more times into the first chain and then slip stitch into the first sc. Unlike in the last pair, don't bother with pulling the first chain tight. You're going to want a larger hole so you don't warp the rest of the circle.
Ch 3 (making the first double crochet) and then 2. *Dc 1 into the next sc, Ch 1, Dc 1 into the next sc, Ch 2* 6 times, and then Dc 1 into the next sc, Ch 1, and slip stitch into the first Dc.
Next, Sc over every chain and in every Dc. Slip stitch into the first sc, cut a tail, pull the tail though, make a knotted loop, attach a earring hook, and you're done.
When I was done, my circle was a bit floppy. If you have the same problem, follow this before adding the hooks: Coat yarn in a bit of Elmer's glue and then rinsed it under the faucet to remove the extra glue gunk. Flatten the earrings between your palms and let them air dry. I hung mine on pushpins, which kept the loop open and made adding the hooks easier.
That's all for tonight guys (some of use have to sleep...) but I'll try to finish off the rest and maybe some extras tomorrow!
Goodnight,
Cristy
This is going to be a long post.. If you don't/can't crochet, go learn. Really.
~*~*~
Trypdisc Earrings
I've used Vanna's Choice in red, rust, and mustard and whichever hook I grabbed first (probably 3-4 mm). You can use any yarn, really, and whichever size they recommend.
Chain 4. This will form your first triple crochet
Triple crochet 12 or 13 more times into the first chain. 12 stitches make a flatter circle, but your circles may not lie exactly straight. Pull the first chain tight as you go. I also like to hide the starting tail (that seems contradictory) under the triple crochets and then trim the excess.
Slip stitch into the fourth chain. Cut a tail a few inches long (at most) and pull through.
Repeat to make 2 more circles.
Pull the tail on the red (bottom) circle between the 7th and 8th triple on the orange (middle) circle. Bring that tail through the slipped stitch in the red (bottom) circle and (this is the manhandling part) weave the tail back into the red (bottom) circle. Repeat with the orange (middle) and yellow (top) circles.
With the yellow (top) use the tail to make a loop for the earring hook.
A note: If you prefer the circle with 13 total triple crochets, you may want to make the second connection between the circles between the 6th and 7th triple stitch. This will cause them to hang more evenly. Also, if you don't mind slightly longer earrings but like some movement, use jump rings instead of yarn to link the circles together.
~*~*~
Blue Swirl Earrings
These were made with Lily Sugar n' Cream in Soft Teal, again with the first hook I found. However, the yarn is a 4-ply yarn, so I cut a length (several yards) and split the yarn in half. (Twice as much yarn!)
Chain 2. You've made the first sc. Sc 13 more times into the first chain and then slip stitch into the first sc. Unlike in the last pair, don't bother with pulling the first chain tight. You're going to want a larger hole so you don't warp the rest of the circle.
Ch 3 (making the first double crochet) and then 2. *Dc 1 into the next sc, Ch 1, Dc 1 into the next sc, Ch 2* 6 times, and then Dc 1 into the next sc, Ch 1, and slip stitch into the first Dc.
Next, Sc over every chain and in every Dc. Slip stitch into the first sc, cut a tail, pull the tail though, make a knotted loop, attach a earring hook, and you're done.
When I was done, my circle was a bit floppy. If you have the same problem, follow this before adding the hooks: Coat yarn in a bit of Elmer's glue and then rinsed it under the faucet to remove the extra glue gunk. Flatten the earrings between your palms and let them air dry. I hung mine on pushpins, which kept the loop open and made adding the hooks easier.
~*~*~
That's all for tonight guys (some of use have to sleep...) but I'll try to finish off the rest and maybe some extras tomorrow!
Goodnight,
Cristy
Tuesday, March 24, 2009
On Recycling.
Side note: Did you notice I changed a lot of picture sizes? I'm sorry if it completely kills your dial-up, but I figured the larger size would make viewing easier and keep everyone from having to crouch over their computers like I do.
I figure that, while we wait on my lovely swap package to get here, it's time for the first of many I <3 Recycling posts. And I really really do. What's not to love about making something beautiful, thought provoking, or inspired out of something that would otherwise end up out with the trash? Not to mention, anything made from junk usually costs little to make, giving you a great profit margin... ^.^ Some people complain that never throwing away junk leads to that disease, packratitis, but I don't mind being guilty as charged. Want some ideas?
When you're knitting or crocheting, keep your yarn scraps and use them as stuffing (like for amigurumi and their ilk).
Get on Ebay and buy a bulk pack of earring hooks (you get several hundred for super cheap). You can refashion them into stitch markers (for knitting or crocheting), loops for pendants (clay pendants are the easiest), clasps, or something like a more interesting jump ring. If you aren't using the tiny little beads and springs that frequently come on hooks, keep them for something else. And of course, have fun playing with different styles of earrings. God knows you don't need to worry about wasting them...
Cut out interesting or appealing stamps and ModPodge them onto a domino or scrabble tile or glue them into a bottle cap. Add some decoration for some more interest.
- Find something interesting, like say a small tile (see below), make a pendant. Use some wire to add decoration and clear nail polish to seal.
- Recon small things, like pushpins or buttons into cute earrings. Warning: Pushpins can be extremely hard to bend with just pliers. I learned this one the hard way...
Yarn scraps are my favorite. You can give them to the birds, use them to embroider details, tie similar weight yarn together and make Berroco's Celestine Crochet (there's knitted version too, but that sounds like a lot of knot tying to me...) or wrap longer scraps around washers or plastic rings for lovely eclectic earrings or a pendant (the patterns in variegated yarns can be played with a bit to produce some nice effects). Want to see a gallery?


And you can see the earring-turned-clasp in the hemp necklace. Yes, I made the ridiculous reconned jean purse that everyone's done. I just wanted to see if I could do it! Do you think the constant newspaper background looks a bit blah? I like it, and by camera handles it well, but too much is too much, I think.
Good luck!
-Cristy
Sunday, March 22, 2009
I feel compelled...
to share this positively fantastic video with you. It's been viewed quite a few times, so you may have already seen it, particularly if you follow Dude Craft. It also only increases my desire for a sheep or other yarn-producing animal....
I wouldn't mind settling for one of those dogs either...
Swap Update: Send outs are this Monday, I believe, and as soon as my partner recieves, I'll post some (more) images.
-Cristy
I wouldn't mind settling for one of those dogs either...
Swap Update: Send outs are this Monday, I believe, and as soon as my partner recieves, I'll post some (more) images.
-Cristy
Wednesday, March 18, 2009
Help me!
So for me to actually post what I have planned, I need some help from you friendly viewers. For my first swap, I created (my very own!!) guide to knitting. It covers the basics, some more complicated stitches, and a few projects. All the stitches are accompanied with step-by-step pictures and advice. It really didn't take me that long to write up, and I think everyone should be able to learn to knit without paying the 20 bucks I did for a Klutz book. >.> So I really want to offer this book for free. So how would I make this pdf most available? I've considered posting it on a site like Megadownload.net, but I'm not sure if there's a bandwidth limit. Posting this on Etsy seems a bit contrary to my freebie ideal, and I don't want to have to keep reposting this item should it become at all popular (cross your fingers, eh?). I would like to know which way you think would be easiest for people to access. And yes, I know you can post files to WordPress, but they keep on coming up as "broken and unfixable." I've tried a few times, and no luck. I don't know whether Ravelry would work either because well, it's not exactly a pattern and I think this will be the final draft. Input, please! The sooner I get comments, the more I'll know what to do...
-Cristy
-Cristy
Things I've Knit/Crocheted Recently
To tide you over until I get a nice in-progress picture of the baby blanket, here are some other things I've done since I started knitting/crocheting, in no particular order:
- Christmas Lace Scarf - made for a good friend after Years of her reminding me she wanted a scarf. And I gave it to her this February (fail). It's an incredibly easy pattern, and only takes a skein for a decently long scarf.

- my turtles that I am so incredibly over-proud of. They stash busted and finished off my Christmas gift list. And I kept the blue one for myself, of course.

- this rather odd pillow-like thing. I'm considering making a whole series of the wind, fire, earth, and water elements but I can't decide whether this pillow is more representative of water or wind. I do have an awesome idea for fire, though. Either way, I plundered it for stuffing and the project will probably have to wait for summer break.

- my highly adapted Crochet Sack. I really enjoyed making it, and I really love the lining fabric, but it's completely not my style. Since my pattern is quite different from the original, I'm wondering what the copyright rules would be about this and whether I could sell it... Anyone interested?

- the always freaking adorable Cthulhu. I really wish I'd had some green yarn, but I guess he's... unique.

- this... Thing. I *had* to use up some left over baby yarn that I hated, hence the color choice. The pattern is original (but not written up just yet) and I've never really seen anything like it. Perhaps there's a reason for that? If I knew more 12 year old girls, maybe I'd have someone to give it to. But really, I think the pattern has potential, just without colors that most people can't get away with wearing.

- And then I have this whole string of crochet jewelry... I haven't really decided what I'm going to do with it all, but since I got my ears pierced last week (finally), I might actually end up using something I've made.


Thanks guys. I apologize for the very vertical post and I promise I'll have something much more interesting soon (winkwink, nudgenudge) so stick around. And just FYI, I really love comments, even if it's just to say you're reading.
-Cristy
Tuesday, March 17, 2009
Knitting until my hands fall off...
Almost since I learned to knit, I've been making baby blankets for whoever I know that becomes pregnant. The first few were... rather awful and painstakingly slow, but now that I've done a few, I think I've got the hang of it. Important things to remember:
- cotton or Really Nice acrylic. Wool and other animal fibers can lead to or aggravate allergies and besides, for us poor people (like college students!) they can get really expensive
- avoid patterns with gaping holes. You can risk getting baby fingers and toes caught and, while unlikely, I'd hate to injure some innocent kid...
I really prefer baby blankets to other blankets I've made (uggg) because they're so much faster and I drop them off as anonymously as possible (generally outside of the teacher's office). But anyways, I think this one's my favorite so far, by miles. Although the project's already tracked on Ravelry, here's the quick and dirty.
- Chevron Blanket (knit version) pattern off Ravelry
- Vanna's Choice Baby yarn in Goldfish and Duckie
- size 8 straight needles (the really long ones... 14 inches?)

See? And there's my Micheal's bill that I used for keeping track of rows until I realized I could just count the number of decreases in a column. BUT it also came in handy for massing the changes in the weight of my ball of yarn, so I could figure out when I'd run out. (I HATE running out of yarn, and I haven't found an LYS that carries cheap yarn yet. I did, however, add an extra column of chevron, since I was using dramatically smaller needles than the pattern called for. So that makes 114 cast on stitches, for future reference. Hopefully I'll have more picture of the actual blanket soon.
- cotton or Really Nice acrylic. Wool and other animal fibers can lead to or aggravate allergies and besides, for us poor people (like college students!) they can get really expensive
- avoid patterns with gaping holes. You can risk getting baby fingers and toes caught and, while unlikely, I'd hate to injure some innocent kid...
I really prefer baby blankets to other blankets I've made (uggg) because they're so much faster and I drop them off as anonymously as possible (generally outside of the teacher's office). But anyways, I think this one's my favorite so far, by miles. Although the project's already tracked on Ravelry, here's the quick and dirty.
- Chevron Blanket (knit version) pattern off Ravelry
- Vanna's Choice Baby yarn in Goldfish and Duckie
- size 8 straight needles (the really long ones... 14 inches?)
See? And there's my Micheal's bill that I used for keeping track of rows until I realized I could just count the number of decreases in a column. BUT it also came in handy for massing the changes in the weight of my ball of yarn, so I could figure out when I'd run out. (I HATE running out of yarn, and I haven't found an LYS that carries cheap yarn yet. I did, however, add an extra column of chevron, since I was using dramatically smaller needles than the pattern called for. So that makes 114 cast on stitches, for future reference. Hopefully I'll have more picture of the actual blanket soon.
Saturday, March 14, 2009
My (reasonably) Comprehensive Knitting Needle Tutorial
Welcome to my Spring Break! I know, I feel bad for you people with real jobs too. But I can sympathize. I have a big test the day we return, as well as a Calculus assignment and a paper to work on. And in a break with tradition, I'm spending my first college Spring Break at home, with my knitting, family and homework. Somewhere in the past few months, I've stopped crocheting, but I miss it terribly.
I signed up for my first Swap ever too, the I Want to Learn to... Swap on Craftster. (And my swap partner should probably stop reading this blog right about now...) I was rather hoping to get someone who would teach me to cross-stitch, but in retrospect, sewing is a lot more useful for me right now. If only I could get my hands on a sewing machine somewhere...
*hopes swap partner has gone*
This is also my first non knitting pattern DIY post! (With another planned for sometime soon) I'm supposed to be teaching my partner to knit but, with bamboo needles being so very expensive, I figured I might as well teach myself how to make them. I know, there's already a sticky thread on Craftster for this, but it's a bit vague and I rather like my pictures. So:
Materials:
- (preferably unused) bamboo chopsticks (I found that the ones from take-out Asian restaurants are of rather poor quality. Places that try to maintain an image, like my local Noodles & Company, have much better supplies.)
- sand paper sheet (i used a foam block sander too, for maximum comfort)
- half a bottle of cheap, clear nail polish
- polymer clay
- Epoxy
- a toothpick
- household oven
- aluminum foil
- a paper napkin
- oven-safe dish (I used a bread pan because I was making beads too, and an unfolded paperclip spans that gap easily.)
- some music (Depending on the number of chopsticks, this could take a while. And check out my sexy cassette player/radio.)

Steps:
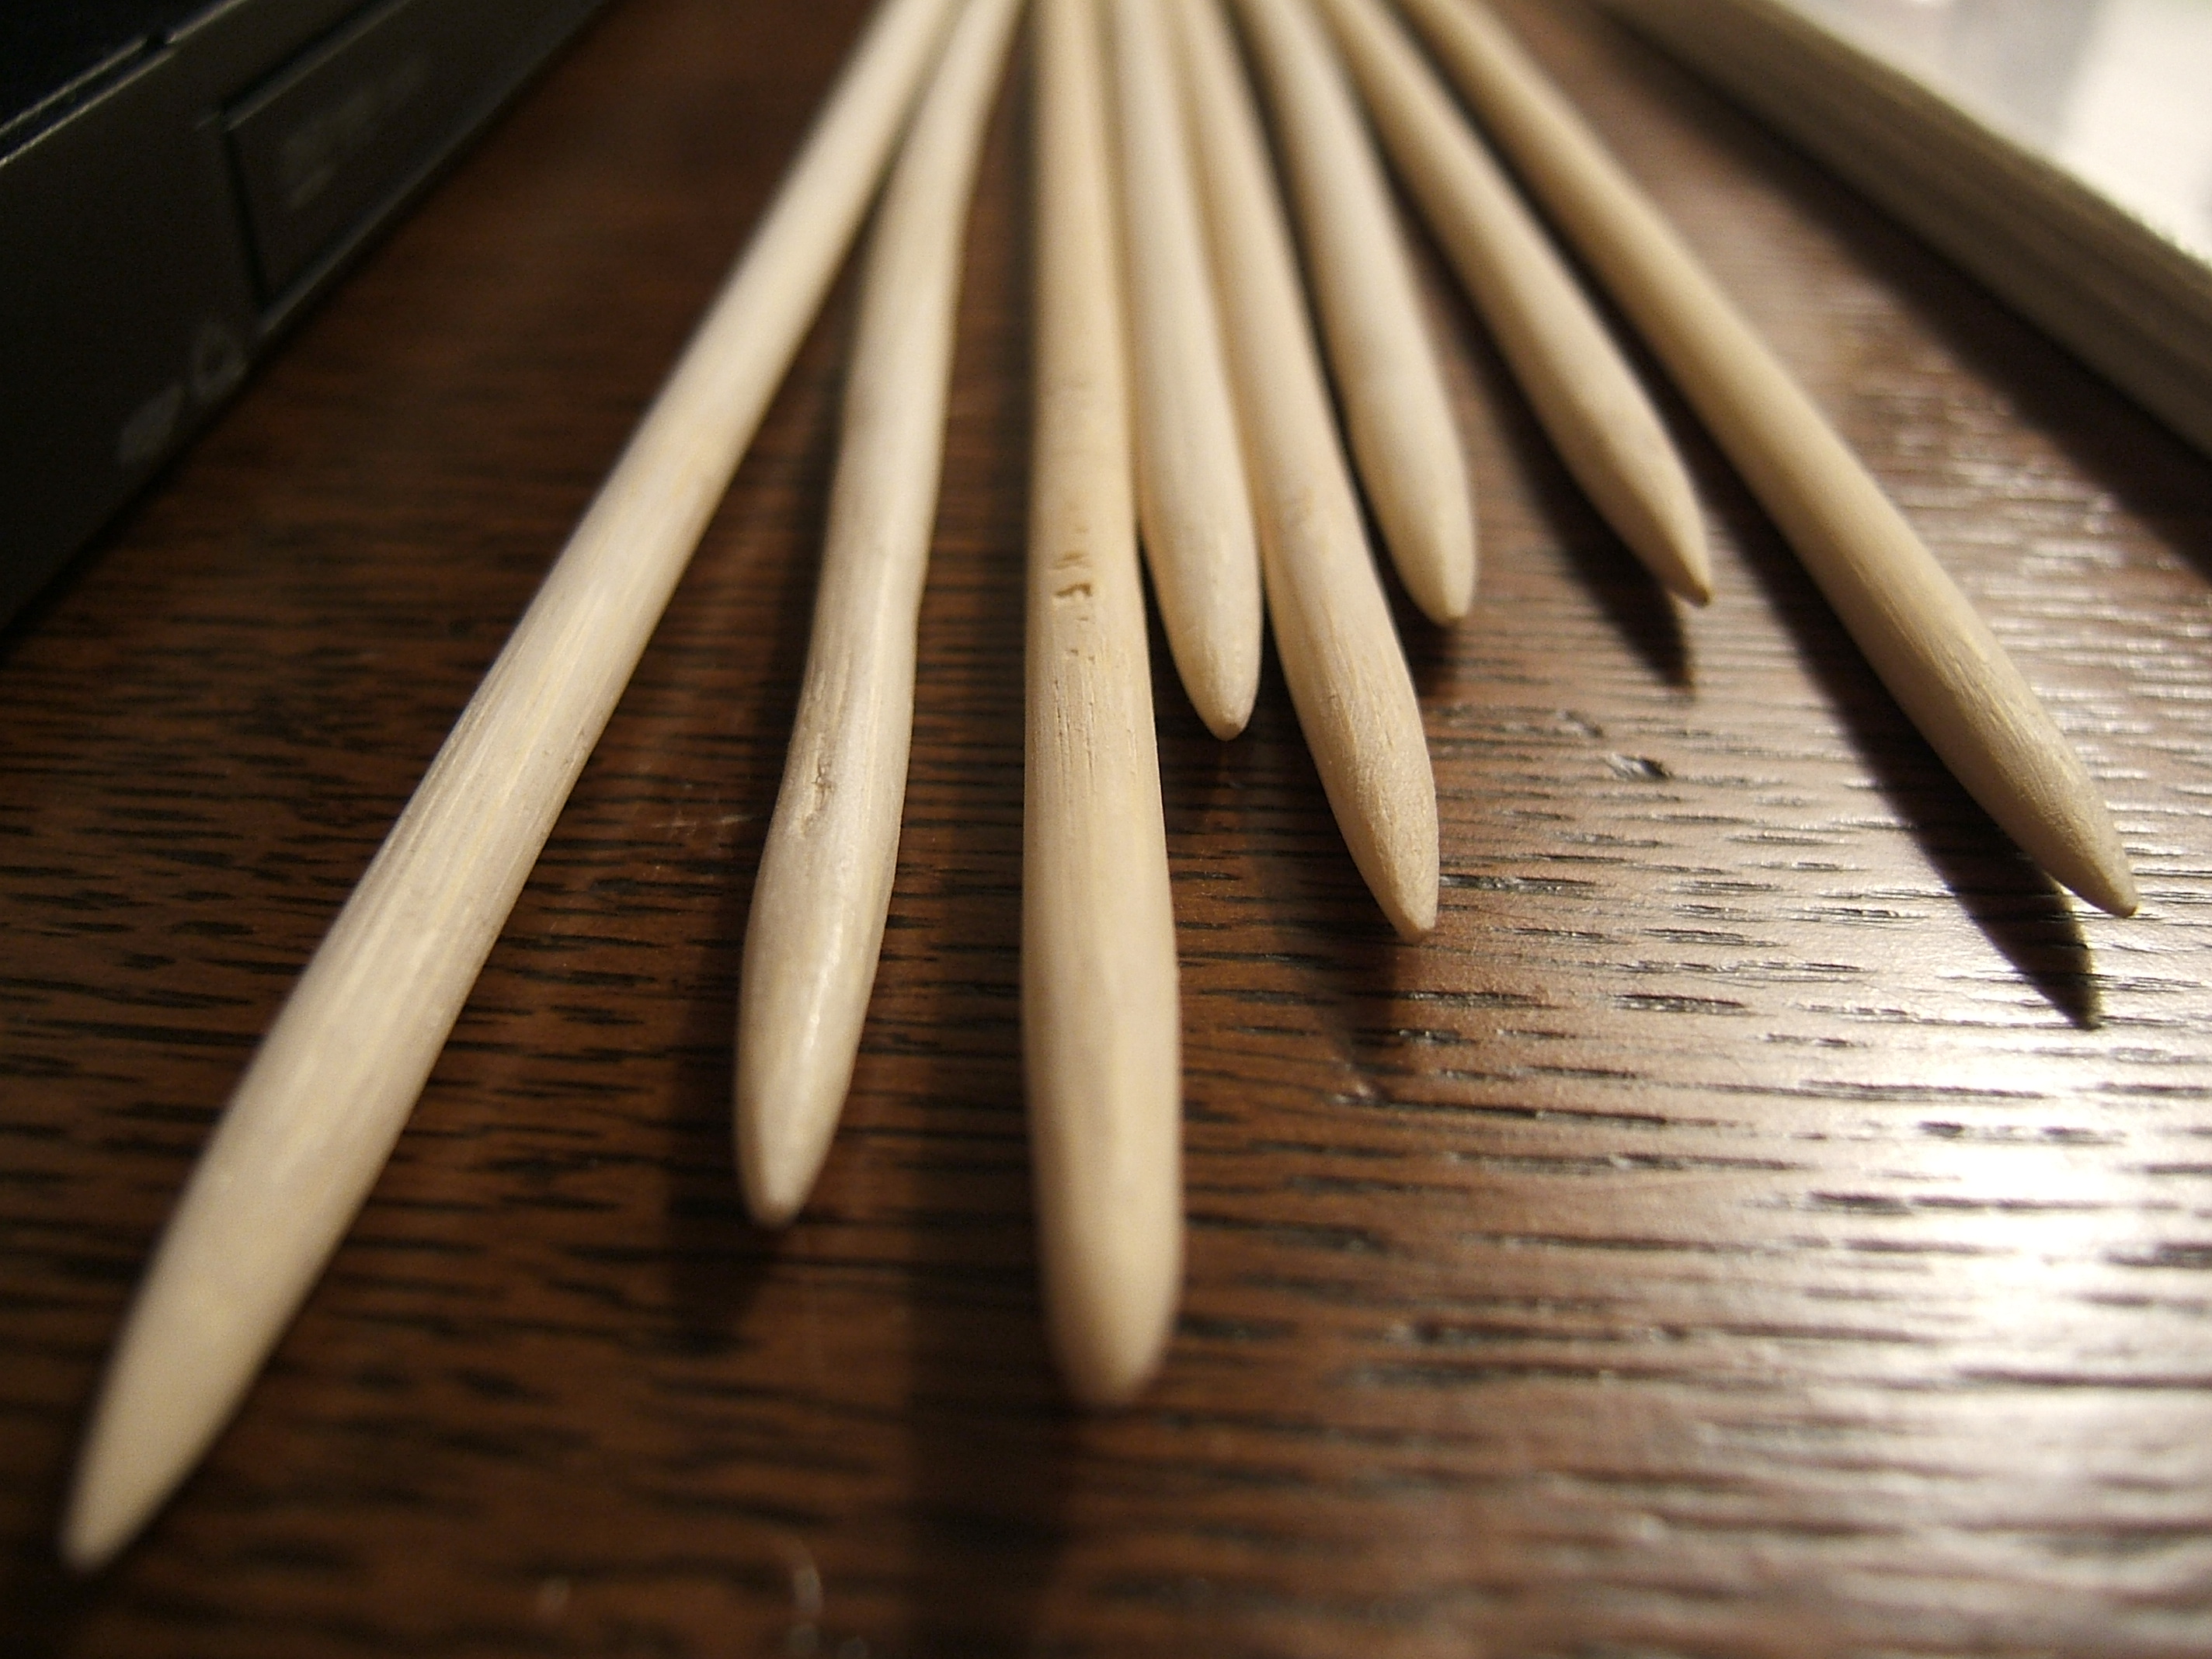
1. Sand down your chopsticks. It's easiest to start with a basic sanding of the stick, since it's the quickest, and then work on the points. It can also be difficult getting really pointy points, but you can with just the right angle.

2. Varnish your pointy sticks with the nail polish. Tip: Hold it at the blunt end. You won't have to varnish that end because we're covering it anyways. While you're waving your sticks around to dry them faster, get high on fumes.

3. Make your knitting needle toppers. Mix bits of color together, coat a ball in slices of cane, or whatever. I got bored with caning and I like the mixed ones better anyways.
4. Press the blunt ends of your needles into the balls of poly clay. You'll want to push them in rather deeply, for security reasons, and try to maintain the spherical shape. These indents are where you'll later glue in your needles.
5. Bake the poly clay balls on the aluminum foil-lined dish for about 10 minutes. My instructions gave a temperature of 275F, but check to be sure.
6. After the toppers are baked, mix the Epoxy. Using a toothpick, smear some into the indents and push in the needles. If any squeezes out, wipe it off quickly with a napkin.
7. Let the Epoxy set. The time depends on the type of Epoxy. I accidentally chose slow drying epoxy, so this was my lunch break.
8. Coat the toppers in a layer of nail polish if you like the shiny look. If not, you were done way back at step 7...
And whahlah:

Notes: Unfortunately, you can't expedite this process by baking the polyclay balls directly onto the needles, as this will melt the varnish and ruin it. Young could varnish the entire needle contraption last, but I like the added Epoxy bonding. If you don't have Epoxy at hand, sand, add poly clay, bake, and then varnish, and you should be alright. And just in case you need proof, the top one was baked, while the bottom wasn't:

Good luck, and I'll try to be back soon with more!
-Cristy
I signed up for my first Swap ever too, the I Want to Learn to... Swap on Craftster. (And my swap partner should probably stop reading this blog right about now...) I was rather hoping to get someone who would teach me to cross-stitch, but in retrospect, sewing is a lot more useful for me right now. If only I could get my hands on a sewing machine somewhere...
*hopes swap partner has gone*
This is also my first non knitting pattern DIY post! (With another planned for sometime soon) I'm supposed to be teaching my partner to knit but, with bamboo needles being so very expensive, I figured I might as well teach myself how to make them. I know, there's already a sticky thread on Craftster for this, but it's a bit vague and I rather like my pictures. So:
Materials:
- (preferably unused) bamboo chopsticks (I found that the ones from take-out Asian restaurants are of rather poor quality. Places that try to maintain an image, like my local Noodles & Company, have much better supplies.)
- sand paper sheet (i used a foam block sander too, for maximum comfort)
- half a bottle of cheap, clear nail polish
- polymer clay
- Epoxy
- a toothpick
- household oven
- aluminum foil
- a paper napkin
- oven-safe dish (I used a bread pan because I was making beads too, and an unfolded paperclip spans that gap easily.)
- some music (Depending on the number of chopsticks, this could take a while. And check out my sexy cassette player/radio.)
Steps:
1. Sand down your chopsticks. It's easiest to start with a basic sanding of the stick, since it's the quickest, and then work on the points. It can also be difficult getting really pointy points, but you can with just the right angle.
2. Varnish your pointy sticks with the nail polish. Tip: Hold it at the blunt end. You won't have to varnish that end because we're covering it anyways. While you're waving your sticks around to dry them faster, get high on fumes.
3. Make your knitting needle toppers. Mix bits of color together, coat a ball in slices of cane, or whatever. I got bored with caning and I like the mixed ones better anyways.
4. Press the blunt ends of your needles into the balls of poly clay. You'll want to push them in rather deeply, for security reasons, and try to maintain the spherical shape. These indents are where you'll later glue in your needles.
5. Bake the poly clay balls on the aluminum foil-lined dish for about 10 minutes. My instructions gave a temperature of 275F, but check to be sure.
6. After the toppers are baked, mix the Epoxy. Using a toothpick, smear some into the indents and push in the needles. If any squeezes out, wipe it off quickly with a napkin.
7. Let the Epoxy set. The time depends on the type of Epoxy. I accidentally chose slow drying epoxy, so this was my lunch break.
8. Coat the toppers in a layer of nail polish if you like the shiny look. If not, you were done way back at step 7...
And whahlah:
Notes: Unfortunately, you can't expedite this process by baking the polyclay balls directly onto the needles, as this will melt the varnish and ruin it. Young could varnish the entire needle contraption last, but I like the added Epoxy bonding. If you don't have Epoxy at hand, sand, add poly clay, bake, and then varnish, and you should be alright. And just in case you need proof, the top one was baked, while the bottom wasn't:
Good luck, and I'll try to be back soon with more!
-Cristy
Sunday, March 1, 2009
Another scarf pattern?
Why yes, although it's another simple one too.
This was the first thing my mother attempted to teach me to knit, although I didn't actually become a knitter until years later. I blame the Homespun yarn, which I would only ever suggest someone with experience use because it's such a pain, despite the pretty colors. And I'm very much an image-based learner, so she could show me how to a million times and I would never get it, really. Here's the pattern!
CO some multiple of 4 stitches (I'm guessing mine is 20 stitches total.)
Row 1: *K2, P2*
Repeat to desired length.
And here's a version done in some fuzzy yarn. Not homespun or eyelash, but somewhere in between. This became my everyday scarf when it got chilly here in North Carolina over winter. The cheap acrylic meant I could still breathe, but it kept the wind from biting quite as hard... I'm working on another in Grape Homespun for a swap, so I should have those up soon too. From afar:

And up close:

Back to my scarf...
-Cristy
This was the first thing my mother attempted to teach me to knit, although I didn't actually become a knitter until years later. I blame the Homespun yarn, which I would only ever suggest someone with experience use because it's such a pain, despite the pretty colors. And I'm very much an image-based learner, so she could show me how to a million times and I would never get it, really. Here's the pattern!
CO some multiple of 4 stitches (I'm guessing mine is 20 stitches total.)
Row 1: *K2, P2*
Repeat to desired length.
And here's a version done in some fuzzy yarn. Not homespun or eyelash, but somewhere in between. This became my everyday scarf when it got chilly here in North Carolina over winter. The cheap acrylic meant I could still breathe, but it kept the wind from biting quite as hard... I'm working on another in Grape Homespun for a swap, so I should have those up soon too. From afar:
And up close:
Back to my scarf...
-Cristy
Subscribe to:
Posts (Atom)