Friday, July 30, 2010

Pattern 11/12: Dog

This is an automated post.  A new pattern will be added every Monday, Wednesday, and Friday from July 7 to Aug 2 and they will be available until I return on Aug 9.  I will also be able to answer comments and questions then.


- Cristy


A few notes:  I suggest making the head last, so you can add ears, eyes, etc as you go.  I places the eyes into the 12th and 16th stitches of the 7th row.  I also weighed the bottom of the body with plastic pellets to keep them standing up, but you may want something heavier (like a pebble or magnet).

Materials:

Red Heart Soft Yarn in Off White and Chocolate

3.0mm crochet hook

Scissors, Yarn Needle, Safety Eyes

Pattern:

The Basic Body and Head patterns are available here.

Dog Ears:

In Chocolate:

Ch 5.  1 sc in the second ch from hook, 1 hdc x 3 in the next chains.  Ch 1, cut yarn, pull through.  Use yarn ends to tie to head.

Dog Face Spot:

Beginning with a Magic Loop, ch 2. (The loop counts as the first ch.)

Round 1 – 8 sc into the first ch. (8)

End with a slst in the next stitch for a more even appearance.  Cut the yarn and pull the tail through.  Use tail to seam to head.

Dog Tail:

In Chocolate:

Beginning with a Magic Loop, ch 2. (The loop counts as the first ch.)

Round 1 – 6 sc into the first ch. (6)

Round 2 - *1 sc* x 6 (6)

Change to Chocolate:

Round 3-4 - *1 sc* x 6 (6)

End with a slst in the next stitch for a more even appearance.  Cut the yarn and pull the tail through.  Use tail to seam to head.

Dog Back Spot: (yes, it's a heart, and cute doesn't need a reason)

In Chocolate:

Beginning with a Magic Loop, ch 3. (The loop counts as the first ch.)

Round 1 – 4 dc, ch 1, 4 dc, 1 hdc into the first ch.  End with a slst in the magic loop.  Cut the yarn and pull the tail through.  Use tail to seam to head.

Wednesday, July 28, 2010

Pattern 10/12: Rooster

This is an automated post.  A new pattern will be added every Monday, Wednesday, and Friday from July 7 to Aug 2 and they will be available until I return on Aug 9.  I will also be able to answer comments and questions then.


- Cristy


A few notes:  I suggest making the head last, so you can add ears, eyes, etc as you go.  I places the eyes into the 12th and 16th stitches of the 7th row.  I also weighed the bottom of the body with plastic pellets to keep them standing up, but you may want something heavier (like a pebble or magnet).

Materials:

Red Heart Soft Yarn in Chocolate, Wine, and Gold (The Red Heart Soft line doesn't have a good yellow, so I used Red Heart Classic in Gold.  There is a textural difference, but the change is not visually apparent.)

3.0mm crochet hook

Scissors, Yarn Needle, Safety Eyes

Pattern:

The Basic Body and Head patterns are available here.

Rooster Comb:

In Wine:

Ch 11.  Beginning in th second chain from the hook, 1 hdc, (1 dc 1tr, 1 dc 1 hdc, 1sc 1 hdc) x 2, 1 dc 1 tr, 1 dc 1 hdc, 1sc.  (the commas indicate advancing to the next stitch.)  Ch 1, cut yarn, pull through.  Use yarn ends to tie to head.

Rooster Beak:

In Gold:

Beginning with a Magic Loop, ch 2. (The loop counts as the first ch.)

Round 1 – 4 sc into the first ch. (4)

Round 2 – *1 sc, 1 inc* x 2 (6)

End with a slst in the next stitch for a more even appearance.  Cut the yarn and pull the tail through.  Use tail to seam to head.

Monday, July 26, 2010

Pattern 9/12: Monkey

This is an automated post.  A new pattern will be added every Monday, Wednesday, and Friday from July 7 to Aug 2 and they will be available until I return on Aug 9.  I will also be able to answer comments and questions then.


- Cristy


A few notes:  I suggest making the head last, so you can add ears, eyes, etc as you go.  I places the eyes into the 12th and 16th stitches of the 7th row.  I also weighed the bottom of the body with plastic pellets to keep them standing up, but you may want something heavier (like a pebble or magnet).  For a tail, a curly crocheted chain works, or a chain, with a row of sc, if you prefer something thicker.

Materials:

Red Heart Soft Yarn in Off White and Chocolate

3.0mm crochet hook

Scissors, Yarn Needle, Safety Eyes

Pattern:

The Basic Body and Head patterns are available here.

Monkey Ears:

In Chocolate:

Beginning with a Magic Loop, ch 2. (The loop counts as the first ch.)

Round 1 – *1 sc* x 4 into the first ch. (4)

Round 2 - *1 inc* x 4 (8)

Ch 1, cut yarn, pull through.  Use yarn ends to tie to head.

Monkey Face:

Beginning with a Magic Loop, ch 2. (The loop counts as the first ch.)

Round 1 – 6sc into the first ch. (6)

Round 2 – *1 inc* x 6 (12)

Round 3 – *1 sc, 1 inc* x 6 (18)

Round 4 – *1 sc* x 18 (18)

End with a slst in the next stitch for a more even appearance.  Cut the yarn and pull the tail through.  Use tail to seam to head.
Friday, July 23, 2010

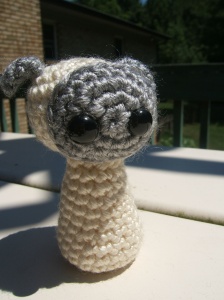
Pattern 8/12: Sheep

This is an automated post.  A new pattern will be added every Monday, Wednesday, and Friday from July 7 to Aug 2 and they will be available until I return on Aug 9.  I will also be able to answer comments and questions then.


- Cristy


A few notes:  I suggest making the head last, so you can add ears, eyes, etc as you go.  I places the eyes into the 12th and 16th stitches of the 7th row.  I also weighed the bottom of the body with plastic pellets to keep them standing up, but you may want something heavier (like a pebble or magnet).

Materials:

Red Heart Soft Yarn in Off White and Light Grey Heather

3.0mm crochet hook

Scissors, Yarn Needle, Safety Eyes

Pattern:

The Basic Body and Head patterns are available here.

Sheep Ears:

In Light Grey Heather:

Ch 5.  1 sc in the second ch from hook, 1 hdc x 3 in the next chains.  Ch 1, cut yarn, pull through.  Use yarn ends to tie to head.

Sheep Face:

Beginning with a Magic Loop, ch 2. (The loop counts as the first ch.)

Round 1 – 6sc into the first ch. (6)

Round 2 – *1 inc* x 6 (12)

Round 3 – *1 sc, 1 inc* x 6 (18)

Round 4 – *1 sc* x 18 (18)

End with a slst in the next stitch for a more even appearance.  Cut the yarn and pull the tail through.  Use tail to seam to head.
Wednesday, July 21, 2010

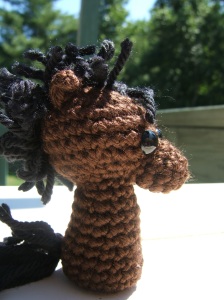
Pattern 7/12: Horse

This is an automated post.  A new pattern will be added every Monday, Wednesday, and Friday from July 7 to Aug 2 and they will be available until I return on Aug 9.  I will also be able to answer comments and questions then.


- Cristy


A few notes:  I suggest making the head last, so you can add ears, eyes, etc as you go.  I places the eyes into the 12th and 16th stitches of the 7th row.  I also weighed the bottom of the body with plastic pellets to keep them standing up, but you may want something heavier (like a pebble or magnet).

Materials:

Red Heart Soft Yarn in Chocolate and Black

3.0mm crochet hook

Scissors, Yarn Needle, Safety Eyes

Pattern:

The Basic Body and Head patterns are available here.

Horse Ears:

In Chocolate:

Ch 3.  1 sc in the second ch, 1 hdc in the first ch.  Ch 1, cut yarn, pull through.  Use yarn ends to tie to head.

Horse Nose:

In Chocolate:

Beginning with a Magic Loop, ch 2. (The loop counts as the first ch.)

Round 1 – 6sc into the first ch. (6)

Round 2 – *1 sc, 1 inc* x 3 (9)

Round 3 – *1 sc* x 9 (9)

End with a slst in the next stitch for a more even appearance.  Cut the yarn and pull the tail through.  Use tail to seam to head.
As for the mane, I suggest Needle Noodles' tutorial for attaching hair.  I made the tail by wrapping yarn around a board about 10 times, tying a knot around one side, and cutting all the wraps on the other side.

Monday, July 19, 2010

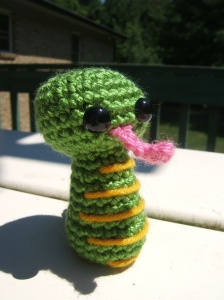
Pattern 6/12: Snake

This is an automated post.  A new pattern will be added every Monday, Wednesday, and Friday from July 7 to Aug 2 and they will be available until I return on Aug 9.  I will also be able to answer comments and questions then.


- Cristy


A few notes:  I suggest making the head last, so you can add ears, eyes, etc as you go.  I places the eyes into the 12th and 16th stitches of the 7th row.  I also weighed the bottom of the body with plastic pellets to keep them standing up, but you may want something heavier (like a pebble or magnet).

Materials:

Red Heart Soft Yarn in Leaf, Pink, and Gold (I thought the pinks available for Red Heart Soft were too light, so I used Vanna’s Choice Baby in Pink Poodle.  Honestly, I can’t even tell the difference!  The Gold, on the other hand, is Red Heart Classic.  There is a textural difference, butthe change is not visually apparent.)

3.0mm crochet hook

Scissors, Yarn Needle, Safety Eyes

Pattern:

The Basic Body and Head patterns are available here.

Snake Tongue:

In Leaf:

Ch 6, 2 slst, ch 3, 5 slst. (The first two go into the second chain, the last three, into the first chain.) Ch 1, cut tail, etc.

Snake Tail:

Beginning with a Magic Loop, ch 2. (The loop counts as the first ch.)

Round 1 – 4 sc into the first ch. (4)

Round 2 – *1 sc, 1 inc* x 2 (6)

Round 3 – *1 sc* x 6 (6)

Round 4 – *1 sc, 1 inc* x 3 (9)

Round 5 – *1 sc* x 9 (9)

End with a slst in the next stitch for a more even appearance.  Cut the yarn and pull the tail through.  Use tail to seam to head.

Friday, July 16, 2010

Pattern 5/12: Dragon

This is an automated post.  A new pattern will be added every Monday, Wednesday, and Friday from July 7 to Aug 2 and they will be available until I return on Aug 9.  I will also be able to answer comments and questions then.


- Cristy


I've returned from my trip and moved everything to a pdf available through Ravelry. Thanks for stopping by though!

Wednesday, July 14, 2010

Pattern 4/12: Rabbit

This is an automated post.  A new pattern will be added every Monday, Wednesday, and Friday from July 7 to Aug 2 and they will be available until I return on Aug 9.  I will also be able to answer comments and questions then.


- Cristy


I've returned from my trip and moved everything to a pdf available through Ravelry. Thanks for stopping by though!

Monday, July 12, 2010

Pattern 3/12: Tiger


This is an automated post.  A new pattern will be added every Monday, Wednesday, and Friday from July 7 to Aug 2 and they will be available until I return on Aug 9.  I will also be able to answer comments and questions then.


- Cristy


I've returned from my trip and moved everything to a pdf available through Ravelry. Thanks for stopping by though!

Friday, July 9, 2010

Pattern 2/12: Ox


This is an automated post.  A new pattern will be added every Monday, Wednesday, and Friday from July 7 to Aug 2 and they will be available until I return on Aug 9.  I will also be able to answer comments and questions then.


- Cristy


I've returned from my trip and moved everything to a pdf available through Ravelry. Thanks for stopping by though!

Wednesday, July 7, 2010

Pattern 1/12: Mouse

This is an automated post.  A new pattern will be added every Monday, Wednesday, and Friday from July 7 to Aug 2 and they will be available until I return on Aug 9.  I will also be able to answer comments and questions then.


- Cristy


I've returned from my trip and moved everything to a pdf available through Ravelry. Thanks for stopping by though!

Monday, July 5, 2010

I'm leaving, on a jet plane....

So.  I have rather big news.  Tomorrow morning, at the god-forsaken time of 6am, I'll be boarding a plane to China!  I've applied to teach English there for a month, which is very, very exciting, but I want to be able to devote myself entirely to teaching and I'm not sure I'll have time to update as regularly as you deserve...  (Also, for all I know, the Great Firewall of China will block my access entirely.  *sigh*  Grr.)

Anyways, since I don't want to leave you staring at a blank wall, I've scheduled an automatic series of posts instead.  So, every Monday, Wednesday, and Friday, beginning with Wednesday, July 7th, a new crochet pattern will magically appear!  All twelve posts will feature a free pattern and these posts will remain until I return August 9th.  After that, I'll pull the posts down, compile them into some sort of PDF (probably both group and individual), and offer them for sale on Ravelry.  I suggest getting them while they're free though. :p

See you in 2 days!

- Cristy

PS - Yeah, I'm not telling you what the patterns are for; you'll just have to wait!

Thursday, July 1, 2010

Teal Dress

Remember that skirt I made from a secondhand shirt?  Well, that wasn't the only men's shirt I grabbed.

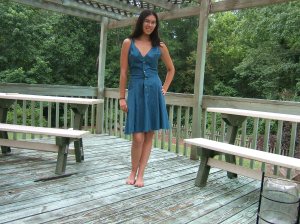
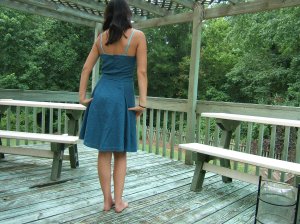
I've been working on a shirt dress, borrowing a lot from Roethke's tutorial on Craftster.  What do you think, so far?


(Ignore the weird proportions that make me look like a giant...)  Even though this is definitely my first dress and I'm having to hand sew the entire thing, it's actually going really, really well.  So far, the hardest part was just figuring out how to get an entire dress out of a single XXL shirt.  (I haven't decided between a halter or straps, so the tops of the bodice are tucked into my bra.)


Both the front and back panels of the bodice (4 of them) came from the front of the shirt.  The half circle skirt was a lot more difficult though...  I cut the sleeves open down the seam and got a quarter of the skirt from each sleeve.  The third quarter came from the center of the back of the shirt, and the fourth and final panel was divided into two separate pieces, which actually worked out really well.  As depicted in the extremely crappy sketch:


I still have a few seams to finish, as well as all the hems, but I think it looks pretty decent so far, despite not being ironed.  At least, the shape looks pretty good, but I'm not sure I can get past it being a *teal dress*.  Teal's a lovely color and it doesn't clash with my skin color, but it's just a lot of blue at once...


Soooooo, what do you think?  Perhaps I could lessen the blueness with appropriate accessories?

- Cristy

Currently Watching: Eight Below

PS: I've been planning something big for Monday, so get excited!

Cute Tank Top Update

I'll have 2 posts today, to make up for the lack of anything recently!

First, I have this black tank top that, while it's incredibly comfortable (and I bought it on sale ^.^), is just a bit boring.  And, since I usually pair it with a plaid skirt, the look makes me feel like a wannabe-punk teenager.  (Definitely not a good thing...)

But I was going through my mom's button stash a few days ago and found some adorable heart-shaped buttons that I had to use.


Unfortunately, they're shank buttons, so they lay a little funny but I love them. <3  I think they're actually leftover buttons from the sweaters my grandmother used to knit me when I was a baby...


I think they make a sale tank from Wet Seal look like something I could've bought for a lot more.  Of course, it could be just as cute without the little heart buttons.  These were some others I was considering:


Yes, I'm a little bit anal about patterns and order...  And I realized the idea was definitely inspired by a picture from Gala Darling:


Have I mentioned I love her?  And I wish I could pull off bright pink hair. *jealous*  Anyone have any hair color tips for more olive skinned people?

- Cristy

Currently Watching: In Plain Sight - "WITSEC Stepmother"